QuickOPC User's Guide and Reference
Generic OPC Browsing Dialog (OPC DA usage)
Icon: ![]()
With OpcBrowseDialog, your application can integrate a dialog with various OPC nodes from which the user can select. This dialog can be configured to serve many different purposes.
Here is an example of the generic OPC browsing dialog in action:
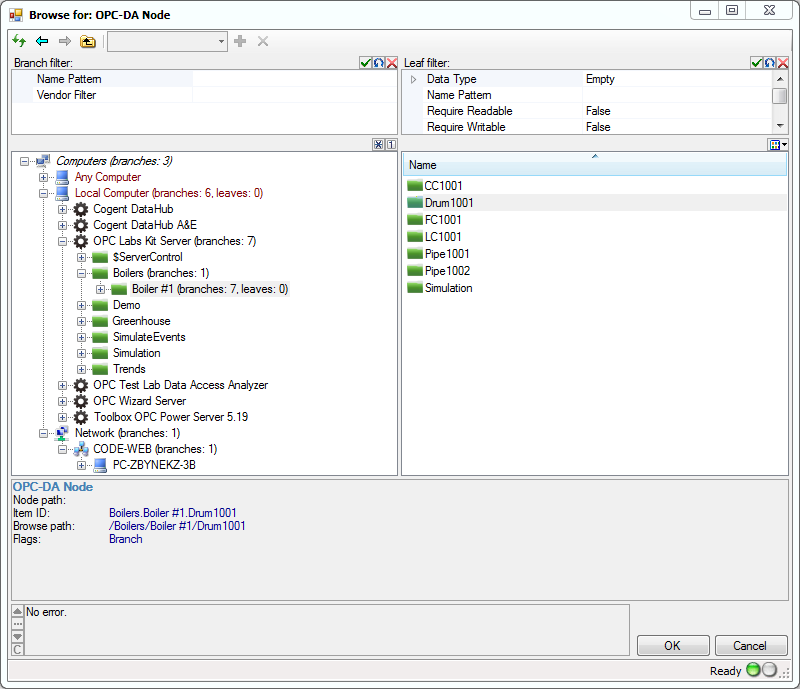
The way the dialog operates is controlled by two main properties:
Values of these properties can be selected from the OpcElementType enumeration, which has members for various types of elements that you encounter when working with OPC.
The following chart shows a hierarchy of element types that you can choose from:
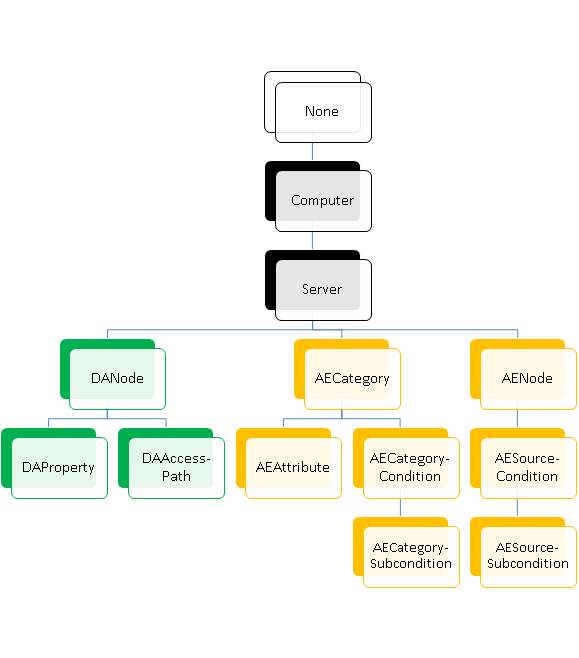
For example, let’ say that you set Mode.AnchorElementType to Server, and Mode.SelectElementType to DAProperty. This will cause the dialog to allow the user to browse for an OPC Item (node) on the server you specify, and then for an OPC property on that item.
In this case, before you run the dialog, you need to provide it with values for the InputOutputs.CurrentNodeDescriptor.ServerDescriptor.Location and InputOutputs.CurrentNodeDescriptor.ServerDescriptor.ServerClass properties, because those define your “anchor” element (Server) that the user cannot change. The dialog will only allow the user to finalize it (besides cancelling) after an OPC property is fully selected, because that is your Mode.SelectElementType. After the dialog is successfully finalized, the information about the user’s choice will be available in the Outputs.CurrentNodeElement.DANodeElement and Outputs.CurrentNodeElement.DAPropertyElement properties.
Note that in addition to the “minimal” scenario described above, you can also pre-set the initial node or property, using the InputOutputs.CurrentNodeDescriptor.DANodeDescriptor or InputOutputs.CurrentNodeDescriptor.DAPropertyDescriptor.PropertyId properties, and after the selection is made, these properties will be updated to the new selection as well. This way, if you run the dialog again with the same value, the initial selection will be where the user has left it the last time the dialog was run.
Obviously, the chosen Mode.SelectElementType must be a child or indirect ancestor of chosen Mode.AnchorElementType in the hierarchy. For example, it would be an error to set Mode.AnchorElementType to AECategory and Mode.SelectElementType to DAProperty.
It is also possible to configure the dialog for a multi-selection. In this mode, the user can select zero, one, or more nodes. In order to enable the multi-select mode, set the Mode.MultiSelect property to true. In the multi-select mode, the initial set of the selected nodes (when the dialog is first displayed to the user) is given by the contents of the InputOutputs.SelectionDescriptors collection. When the user makes the selection and accepts it by closing the dialog, this collection is updated, and also, all information about the selected nodes is placed to the Outputs.SelectionElements collection.
There are also ways to control some finer aspects of the dialog. For example, the Mode.ShowListBranches property (defaults to true) controls whether the branches of the tree are also displayed in the list view.
If you want to change the parameters of the client objects the component uses to perform its OPC operations, you can use the DAClientSelector Property or the AEClientSelector Property.